

Master Accessories Care Workflow for Device Longevity
Every parent knows the headache of tracking down a clean phone case while juggling the demands of family life in London. Keeping your device accessories hygienic and well maintained can easily slip down the list, yet neglecting care can mean more breakages and less reliability. With simple steps and a dedicated cleaning area, you can keep your phone accessories lasting longer while reducing mess and stress in your home.
Table of Contents
- Step 1: Prepare Cleaning Area And Gather Supplies
- Step 2: Remove And Inspect All Device Accessories
- Step 3: Clean Accessories Using Safe, Suitable Methods
- Step 4: Dry And Sanitise Thoroughly Before Reuse
- Step 5: Reassemble And Check Accessory Fit And Function
Quick Summary
| Key Insight | Explanation |
|---|---|
| 1. Set up a cleaning station | Select a clean, well-lit area with necessary supplies for an efficient cleaning process. |
| 2. Inspect accessories thoroughly | Carefully check each accessory for damage or wear to decide on proper care or replacements. |
| 3. Use suitable cleaning methods | Clean accessories gently with appropriate detergents and techniques to avoid damage. |
| 4. Sanitize and dry completely | Ensure all items are fully dried and sanitized to prevent bacteria growth before reuse. |
| 5. Regularly maintain accessories | Schedule monthly cleanings to keep devices protected and functioning optimally throughout the year. |
Step 1: Prepare cleaning area and gather supplies
Before you touch a single cable or case, set up your workspace properly. Think of this as creating a small cleaning station rather than just grabbing supplies willy-nilly. Having everything organised and ready means you’ll actually follow through on maintaining your accessories instead of putting it off.
Find a clear, flat surface in your kitchen or bathroom where you can work undisturbed. Make sure it’s well-lit and has easy access to warm water. You’ll want enough room to lay out your items without them rolling about or getting knocked over. If you’ve got young children at home, choose a spot away from their usual activity areas to avoid interruptions and cross-contamination.
Now gather your supplies. You’ll need warm water, a mild detergent suitable for electronics, and disposable cloths or wipes. According to guidance on safe management of care equipment, having separate cleaning cloths prevents spreading dirt between different accessories. Grab some old towels too, nothing fancy, just something to dry items properly. Wear disposable gloves to protect your hands and keep everything hygienic. If you’re cleaning multiple accessories, keep a separate cloth for each one to avoid mixing contaminants.
Check your accessory’s manufacturer instructions before you start. Different phone cases, charging cables, and protective covers have specific care requirements that actually matter. Some materials need gentler handling than others. Store all your supplies within arm’s reach so you don’t leave your cleaning area mid-task to hunt for something.
Once everything’s in place, you’re ready to begin the actual cleaning process. Having this preparation done properly makes the whole job quicker and far more effective, which honestly matters when you’re juggling family commitments.
Here is a concise table summarising essential accessory care supplies and their purposes:
| Supply Item | Primary Purpose | Special Considerations |
|---|---|---|
| Mild detergent | Removes dirt and oils | Must be suitable for electronics |
| Disposable cloths | Cleans and dries surfaces | Use a separate cloth per accessory |
| Isopropyl alcohol | Sanitises and kills bacteria | Should be 70% for effectiveness |
| Disposable gloves | Protects hands and maintains hygiene | Change if heavily soiled |
| Old towels | Drying items after cleaning | Ensure towels are freshly washed |
| Disinfectant wipes | Quick sanitation, spot cleaning | Use only on non-porous surfaces |
Pro tip: Set up your cleaning station on a Saturday morning and keep supplies together in a small container so you can grab everything in seconds when you need to clean your accessories.
Step 2: Remove and inspect all device accessories
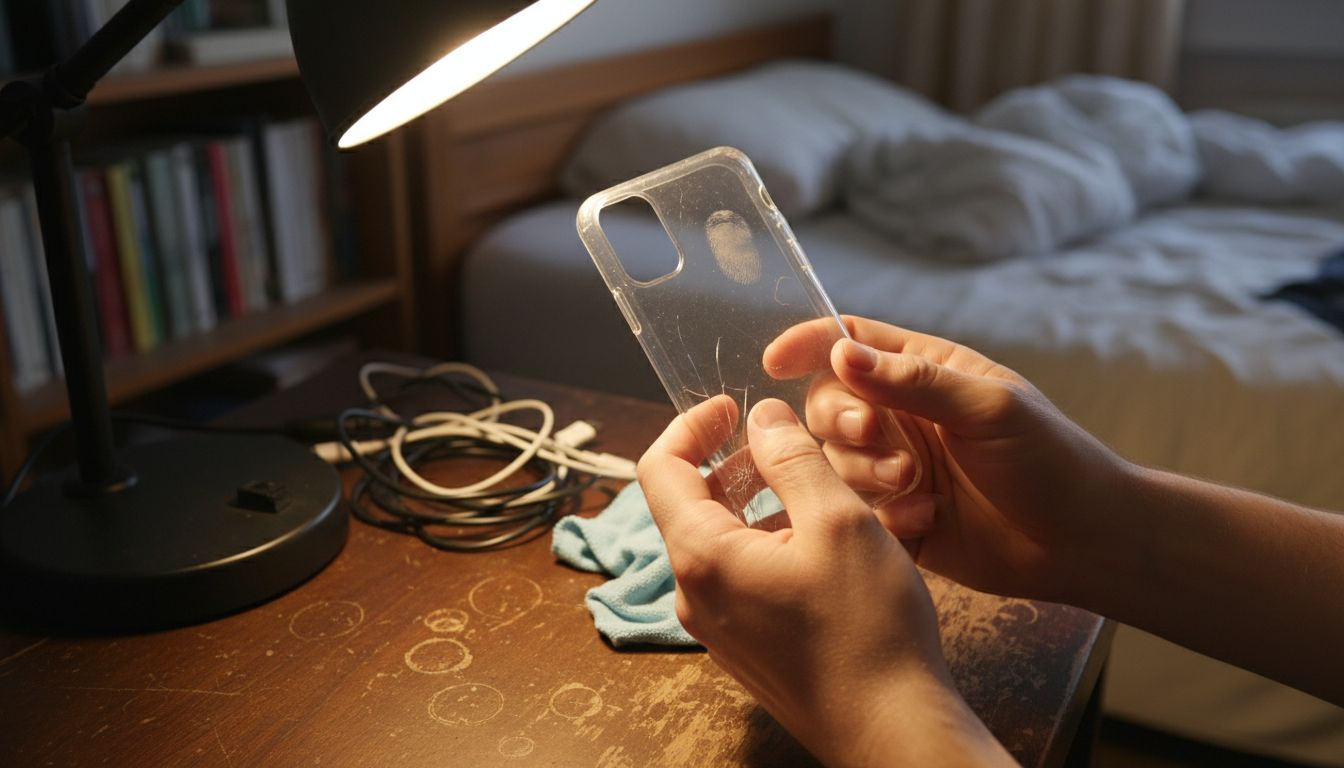
Now that your cleaning station is ready, it’s time to carefully take apart your phone setup. You’ll remove each accessory from your device and give it a thorough visual check before cleaning begins. This inspection step is crucial because it reveals problems you might otherwise miss.
Start by gently detaching your phone case from the device. Work slowly and deliberately, especially if it’s a snug fit. Remove any screen protectors, charging cables, or other connected accessories one by one. Keep them all together in your designated cleaning area so nothing gets lost. If you have multiple devices with different accessories, group them separately to avoid mixing things up.
Once everything is detached, examine each piece carefully under good lighting. Look for visible dirt, dust accumulation, or any signs of wear. Check closely for cracks in the case, splits in cables, or fraying edges. Inspecting accessories for damage helps you decide whether items are still safe to use or need replacing. Pay particular attention to charging port areas where dirt builds up easily and connector points where wear happens fastest.
If you spot damage like splits, cracks, or broken corners, set that accessory aside. Damaged phone cases or charging cables don’t provide proper protection and may pose safety risks. Sometimes a cracked protective case has done its job protecting your device, and it’s time for a replacement. Don’t be tempted to keep using damaged accessories just because they still technically work.
For accessories that look fine, note any problem areas you spotted so you know where to focus during cleaning. A cable with sticky residue near the connector needs special attention. A case with dirt buildup in corners requires a bit more scrubbing. This mental note helps you clean more effectively in the next steps.
To clarify common accessory issues and recommended actions, see the table below:
| Accessory Issue | Potential Cause | Recommended Action |
|---|---|---|
| Cracked phone case | Impact or drop | Replace to maintain protection |
| Frayed charging cable | Repeated bending | Discard and acquire a new cable |
| Sticky residue on cable | Accumulated dirt or spillage | Clean thoroughly with mild detergent |
| Build-up in case corners | Dust or pocket debris | Target with detail cleaning |
| Loose connector | Wear or misfit | Inspect and realign or replace |
Pro tip: Keep a small notebook in your cleaning station to record which accessories need replacement so you can order StudioShake replacements when you have time, rather than scrambling later when something fails.
Step 3: Clean accessories using safe, suitable methods
With your accessories inspected and ready, it’s time to clean them properly. The key is using methods that remove dirt and grime without damaging the materials. You’ll want to be thorough but gentle, much like washing delicate items of clothing rather than scrubbing pots.
Start with your mild detergent solution. Mix warm water with a small amount of gentle detergent suitable for electronics. Dip a soft cloth into this solution and wipe down your phone case, working into corners and crevices where dust accumulates. For charging cables, use the damp cloth to wipe along the entire length, paying special attention to the connector ends where debris builds up. Avoid soaking cables completely as water near electrical components requires careful handling.
When cleaning with detergent solutions, make sure to rinse thoroughly after wiping. Use a separate cloth dampened with plain warm water to remove all soap residue. Any leftover detergent can leave a sticky film that attracts more dirt later. For screen protectors and small items, a brief dip in the detergent solution followed by a rinse cloth works well.
For electronic components or sensitive areas like charging ports, use approved disinfectant wipes rather than submerging them. A single wipe across the connector area removes bacteria and grime safely. Don’t scrub aggressively at delicate parts. Remember that protective accessories do a real job, so treat them with respect during cleaning.
Once everything is clean and rinsed, pat items dry with a fresh towel. Leave them on your cleaned workspace to air dry for a few minutes before reassembling. Never rush to put a damp phone case back on your device. Moisture trapped inside can cause problems over time.
Pro tip: Keep your cleaning supplies in the same location and repeat this process monthly. Regular light cleaning prevents dirt buildup, which means your accessories stay looking better and protect your devices more effectively.
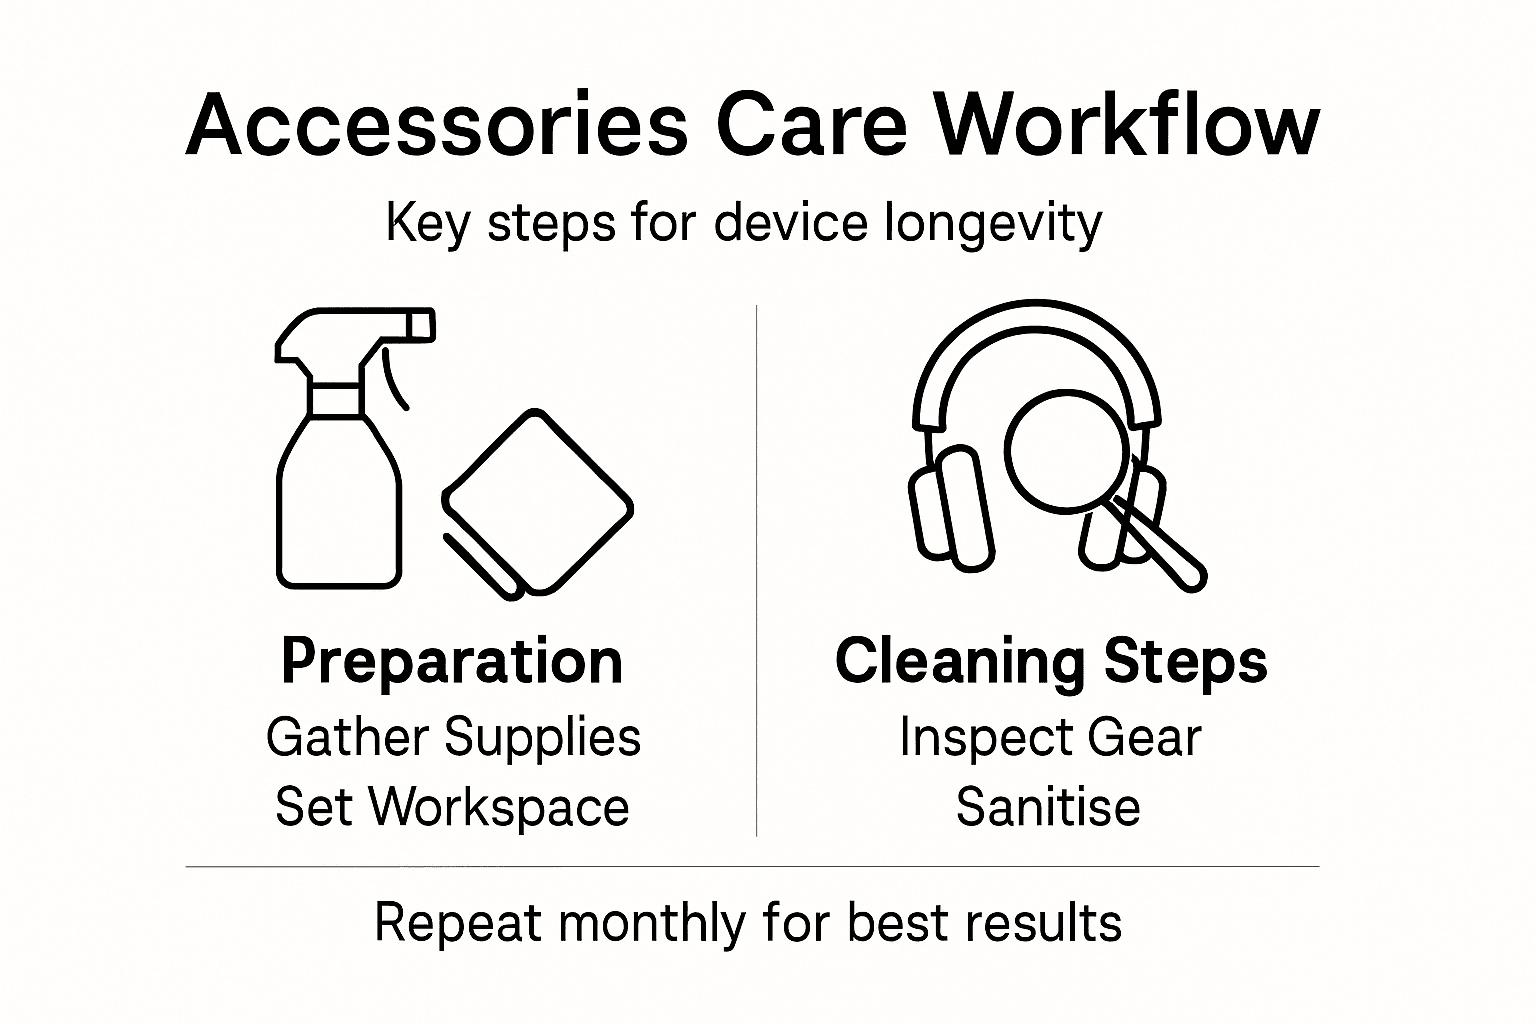
Step 4: Dry and sanitise thoroughly before reuse
You’re nearly there. Now comes the step that actually stops bacteria and germs from taking hold on your accessories. Proper drying and sanitising transforms your cleaned items into hygienically safe products ready for daily use.
Start by patting everything completely dry with a fresh disposable towel. Work methodically through each accessory, paying special attention to crevices, corners, and any recessed areas where water can hide. Leave items on your clean workspace to air dry for at least 10 to 15 minutes. Any residual moisture left behind creates the perfect environment for bacteria to multiply, so don’t skip this step even if items look dry to the touch.
Sanitising with appropriate disinfectants is your next move. Use 70 percent isopropyl alcohol or a manufacturer approved disinfectant wipe. Wipe down each accessory thoroughly, ensuring you cover all surfaces and edges. For phone cases, don’t forget the inner surfaces that touch your device. For charging cables, wipe along the entire length including the connector ends. Let the disinfectant sit on the surface for the contact time specified by the product, typically 30 seconds to one minute.
For items like screen protectors or very delicate accessories, a single thorough wipe with a disinfectant wipe is sufficient. You don’t need to oversaturate anything. The goal is even coverage that kills germs without damaging materials. Once you’ve sanitised everything, allow items to dry completely. This takes another 5 to 10 minutes at room temperature.
Once everything is completely dry and sanitised, your accessories are genuinely ready to go back on your devices. Store them in your designated cleaning area if you’re not reassembling immediately, keeping them away from dust or contamination until use.
Pro tip: Keep your isopropyl alcohol or disinfectant wipes in a sealed container near your cleaning station so they don’t dry out between cleaning sessions. A 200ml bottle lasts months with regular accessory care.
Step 5: Reassemble and check accessory fit and function
Your accessories are now clean, sanitised, and completely dry. Time to put everything back together and make sure it all works properly. This final check ensures your devices are protected and functioning exactly as they should be.
Start by carefully reattaching your phone case to your device. Press it on firmly but gently, working around all edges to ensure it sits evenly. The case should feel snug without requiring excessive force. If you’re using a screen protector, align it carefully with your phone screen and smooth it down from the centre outwards to avoid air bubbles. Take your time with this step rather than rushing it.
Next, reconnect your charging cables and any other accessories. Following manufacturer instructions during reassembly ensures everything fits securely and functions properly. Insert charging cables firmly into ports until you feel a satisfying click or resistance. The connector should not wiggle or feel loose. For wireless charging cases, place your device on a charger to verify it still charges without issues.
Now perform a functional check. Connect a charging cable and confirm your phone recognises it and begins charging. If you’ve reattached a screen protector, test touch sensitivity across the entire screen by tapping different areas. With your case back on, check that buttons press smoothly and speakers produce clear sound. Everything should feel and work exactly like it did before you started this cleaning process.
If anything feels wrong, looks misaligned, or doesn’t function properly, remove that accessory and inspect it again. Sometimes a small piece of debris gets caught during reassembly, or an item needs repositioning. Don’t ignore warning signs like loose connections or unresponsive buttons.
Once you’ve confirmed everything works perfectly, you’re genuinely finished. Your accessories are now clean, sanitised, and ready to protect your devices for weeks to come.
Pro tip: Schedule this entire accessory care workflow for a Saturday morning once a month. Building it into your routine means you never forget, and your devices stay protected consistently throughout the year.
Protect Your Devices with StudioShake’s Expertly Crafted Accessories
Mastering your accessories care routine is essential to keep your devices safe and fully functional. We understand the challenges of avoiding cracks, frayed cables, and dirt buildup that the article highlights as common pain points. StudioShake provides a range of phone cases and mobile accessories that not only enhance protection but are also easy to maintain, helping you avoid the hassle of constant repairs or replacements.
Our durable products fit perfectly and withstand daily wear, making your monthly cleaning rituals more effective and rewarding. Experience accessories designed with your device’s longevity in mind, so you can spend less time worrying about damage and more time using your gadgets confidently.

Discover the peace of mind that comes from using premium accessories. Visit StudioShake today to explore our collection and start protecting your devices the smart way. Ensure your gear works flawlessly by pairing the right accessories with your care routine. Don’t wait until wear and dirt compromise your devices order now and enjoy lasting protection.
Frequently Asked Questions
How often should I clean my device accessories for optimal longevity?
Regularly cleaning your device accessories is recommended at least once a month. Schedule a cleaning session on a Saturday morning to ensure your items stay protected and functional throughout the month.
What supplies do I need for the accessories care workflow?
You will need warm water, a mild detergent suitable for electronics, disposable cloths or wipes, and 70% isopropyl alcohol. Gather these items before starting the cleaning process to keep everything organised and efficient.
How can I tell if an accessory is damaged and needs replacing?
Inspect each accessory for cracks, fraying, or excessive wear during the cleaning process. If you notice any damages, set the item aside for replacement to ensure your devices remain adequately protected.
What steps should I follow to clean my phone case and charging cables properly?
Start by creating a mild detergent solution and using a soft cloth to wipe down your phone case and cables. Rinse thoroughly with warm water and pat dry with a clean towel before sanitising with a disinfectant wipe.
Why is it important to sanitise my accessories after cleaning?
Sanitising your accessories kills any remaining bacteria and germs, promoting a healthier usage experience. After cleaning, use an appropriate disinfectant to wipe down all surfaces, allowing them to dry completely before reassembling.
What should I do if my accessory doesn’t fit or function properly after cleaning?
If an accessory feels loose or isn’t functioning correctly, re-inspect it for debris or misalignment. Adjust or reposition the item as necessary to ensure secure and proper function before using it again.